martedì 19 maggio 2015

JUNIPER SRX 1400 Firmware Upgrade

Buon salve all,
how are you? How does proceed your digital life?

Today we speak about....Juuuuniiiiipeeeer!!!
Yes, you understand correctly, I speak again of Juniper firewalls and in particular SRX 1400 models.
It's the second time I have to update the firmware of a SRX 1400, and it's te second time I encounter some issues.

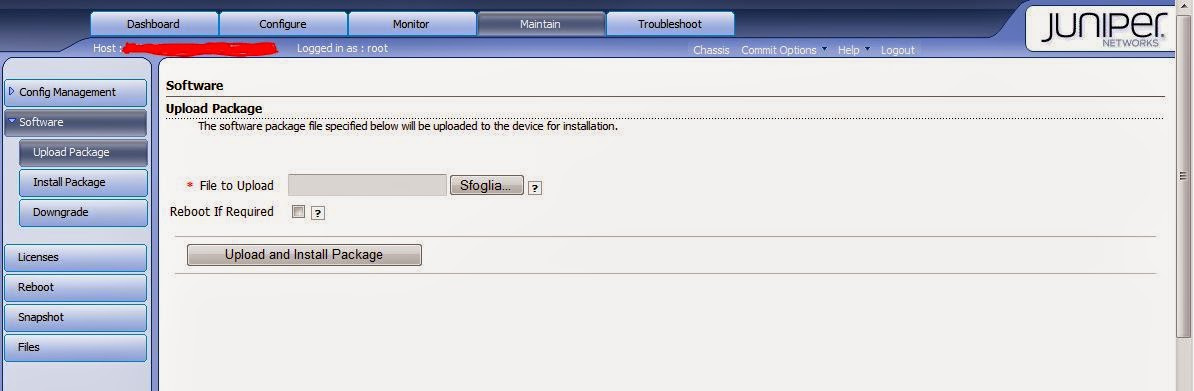
The first procedure I try to follow, it has been the upgrade directly from Web Interface.


The web pages doesn't proceed on the following steps. (Instead I used this procedure for, for example, SRX240 or lower). I have tried both with Internet Explorer, both with Firefox and also with Chrome. The results it has been always the same: failure.

So I have decided to try with the second procedure: ftp and tftp upload of the file and request of the firmware upgrade via console. I report, the procedure I have followed (Juniper Link), below.

Follow these steps to copy the software to the SRX device and then perform the software installation via the CLI:

Copy software to SRX via SCP or FTP to /var/tmp:

For example:
user@srx>  scp  junos-srxsme-11.4R4.4-domestic.tgz  user@srx:/var/tmp/junos-srxsme-11.4R4.4-domestic.tgz

OR

user@srx>  ftp <ip address of local ftp server>  (and login)
user@srx>  lcd /var/tmp
user@srx>  bin
user@srx>  get junos-srxsme-11.4R4.4-domestic.tgz
user@srx>  bye

Install software with the commands below.  For detailed instructions, refer to Installing the Software.

For example:
From the local file in /var/tmp
user@srx>  request system software add no-copy /var/tmp/junos-srxsme-11.4R4.4-domestic.tgz
user@srx>  request system reboot

The results it has been the same as before: failure. It was not possible to open the ftp server installed in the client. The communication between SRX1400 and client was ok (they can ping each other). No windows firewall onboard the PC.


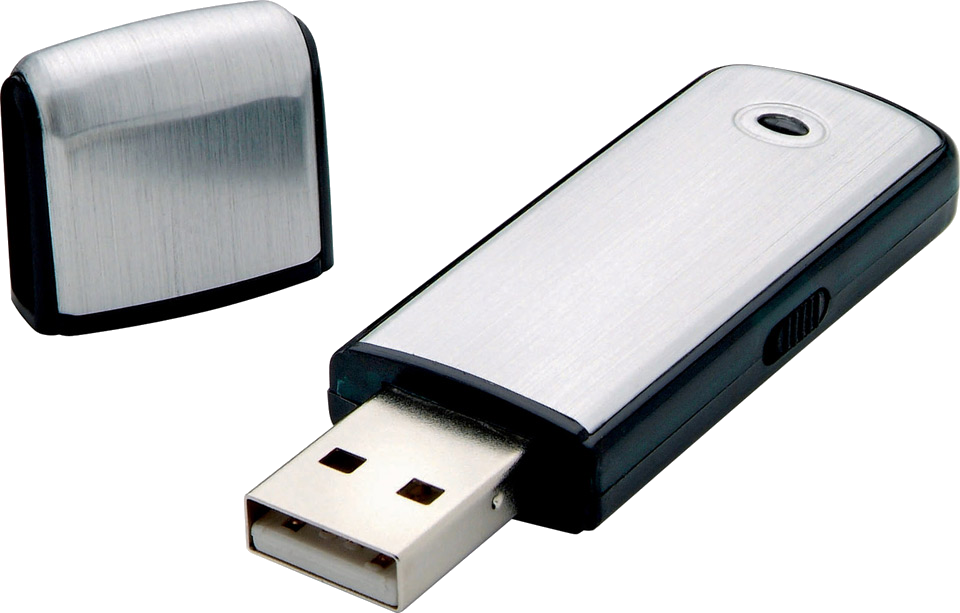
So I have decided to try with the third and solving procedure: upload the file from a USB stick and request of the firmware upgrade via console. I report, the procedure I have followed (Juniper Link), below.

Follow these steps to install the software via the CLI from a USB stick:

Download the Junos upgrade file to the USB stick.

Locate the USB device ID that Junos is associating to the USB stick:

user@srx> start shell
user@srx% ls /dev/


Insert the USB device into the USB slot.  For example, slot 0 would return the following:

root# umass0: USB USBFlashDrive, rev 2.00/1.00, addr 2
da0 at umass-sim0 bus 0 target 0 lun 0
da0: <USB USBFlashDrive 0100> Removable Direct Access SCSI-0 device
da0: 1.000MB/s transfers
da0: 980MB (2007040 512 byte sectors: 64H 32S/T 980C)


Run the following command

user@srx% ls /dev/

Locate difference in outputs to locate drive label. (It will usually be da#s1, i.e. da0s1)

Create a mount directory:

user@srx% mkdir /tmp/usb

Mount the USB to the directory:

user@srx% mount -t msdosfs /dev/<drivelabel, e.g. #da0s1> /tmp/usb

Example:
user@srx% mount -t msdosfs /dev/da0s1 /tmp/usb (there is a space between the label name and /tmp)


Verify that the USB is mounted to the device:
root@% pwd
/cf/root
root@% cd /tmp/usb/
root@% pwd
/cf/tmp/usb
root@% ls
junos-jsr-11.4R5.7-export.tgz


Exit shell and install the software:

user@srx% exit
user@srx> request system software add /tmp/usb/<upgrade filename> no-validate no-copy


For additional details regarding a software installation, refer to the instructions at Installing the Software.
Upon completion, reboot the SRX, BUT BEFORE REMOVE THE USB DEVICE FROM SRX (if not the SRX try to boot from USB Device - My personal note due to personal experience ;) )

user@srx> request system reboot


This procedure it has been to one that solved my issue...two times.


And for today it's all.

I hope this post can help you and your troubleshooting! 
Have a nice digitalday!
DiGiTsHaMaN

giovedì 4 dicembre 2014

JUNIPER SRX240 HA FAILS

Buon salve all,
how are you? How does proceed your digital life?

Today I would like to speak, again, about Juniper SRX and HA. Today I would like to speak you about an issue I encounter in my digital working life. I receive two new Juniper SRX240 with the firmware 12.1X44 already on board.


My goal is to create the cluster of both SRX 240 and the starting point was following these Juniper instructions: SRX Getting Started - Configure Chassis Cluster (High Availability) on a SRX240 device

Probably it's my fault, probably not, it doesn't matter. The point was that, the first check suggest by Juniper:

In the SRX configuration, remove any existing configuration associated with the interfaces that will be transformed into fxp0 (out-of-band management) and fxp1 (control link) when the chassis cluster feature is enabled. 

it didn't work, and so I  was not able to start the cluster configuration. I tried a lot of things, beleve me, but nothing work. Finaly I found the following Juniper document that solve my issue: [SRX] How to recover or prevent a chassis cluster from going into a Hold/Lost state

I propose you, here, the main passage of the document. Very usefull and solving for my case.

The main purpose of the document is to explain how to remove the configuration on the interfaces that will be used as fxp0 (out-of-band management) and fxp1 (control) in a chassis cluster. Pay attention, this is a very

Important:  When configuring your chassis cluster, these two interfaces should NOT have any configuration.  This is a prerequisite.

Follow the instructions for an SRX running 'factory default config' or for an existing stand-alone SRX below:

For an SRX running 'factory default config':
The 'factory default config' by default contains configuration on the interfaces that are transformed into the fxp0 and fxp1 interfaces. Therefore, it needs to be deleted by you before enabling chassis cluster mode.

There are two conditions that a device is running a 'factory default config':
  • A new device
    • Generally it is seen in the production environment that the new devices are used for the chassis cluster. These new devices come with the factory-default configuration which have some or the other config on these interfaces.
  • Device crashes and comes back with factory default config.
    • Rarely, but if a device in chassis cluster mode crashes, it may come up with the factory default configuration.

To remove the configuration on the interfaces, it is typically easiest to delete the factory-default configuration and configure the device from scratch.

To delete the configuration:

Warning: The following procedure removes the current configuration.  

  • Get into the configuration mode.
  • Execute the # delete command. (This command deletes the current configuration from the device.) 
root# delete
This will delete the entire configuration
Delete everything under this level? [yes,no] (no) yes 
3

  • Configure the root password and commit:
root# set system root-authentication plain-text-password
root# commit


OR
For an existing stand-alone SRX:
If your SRX is currently running in a production environment, then check to see if there is configuration on the interfaces that will be transformed into fxp0 and fxp1. To determine which interfaces will be transformed into fxp0 and fxp1, refer to KB15356 - How are interfaces assigned on J-Series and SRX platforms when the chassis cluster is enabled and Node Interfaces on Active SRX Series Chassis Clusters.

Then to find the configuration for those interfaces, run these commands in configuration mode and delete all the configuration from every configuration hierarchy in which those interfaces are being used:

show | display set | match <control port physical interface>
show | display set | match <fxp0l port physical interface>


If you wish to remove the entire config and reconfigure the device for chassis cluster, follow the procedure to delete the entire configuration, as shown in the 'factory default config' instructions.


in my case I run the first one of the two solution. When done I start again following the instructions about clustering SRX240 appliances and all was good.

And for today it's all.

I hope this post can help you and your troubleshooting! 
Have a nice day!
DiGiTsHaMaN 


giovedì 20 novembre 2014

CISCO LAYER 3 SWITCHES AND ROUTING

Buon salve all,
how are you? How does proceed your digital life?
Today, after some posts related to Juniper, I would like to speak briefly of Cisco.
In particular I want to remember you and me one importat thing about the layer 3 switches. I excuse with you if you find this argument too much simple, in this case please, consider this post just a simple reminder.

I directly come to the point:

in a layer 3 Cisco switch, if you don't type the command ip routing you can configure alla the interface vlan that you need, all the ip route that you want, but the switch doesn't apply routing.

In fact if you type the command show ip route to check the routing table, you find that is empty.

After applying the command ip routing you find the routing table as expected: with all the directly connected route and the static route you have configured.

And for today it's all.

 I hope this post can help you and your troubleshooting!


Have a nice day!
DiGiTsHaMaN


venerdì 4 luglio 2014

JUNIPER SRX 1400 LAYER 2 HA

Buon salve all,
how are you? How does proceed your digital life?
Today I return to speak about the Juniper SRX 1400 and, in particular, about another issue we have in our environment: the configuration of HA via layer 2 Cisco Switches.

First of all I spend two simple words about Juniper SRX and HA.
In a cluster there needs to be a lot of communication between the two cluster nodes. This communication is mainly required to synchronize states and send keepalives to detect that the other node is still present. 

This communication is going over two different links: a ‘control’ link and a ‘fabric’ link.
  • The control link is used to send control traffic between both the Routing Engines (REs) and between the Primary RE (RG0 primary) and the remote Packet Forwarding Engine (PFE).
  • The fabric link connects both PFE’s together. This link is utilized for two main functions.
The first function is to synchronize the session states between the two nodes. This is done via RTO (real-time objects) packets going over the fabric link. There are many types of RTO messages, but some of the most important ones are the ‘session create’ and ‘session delete’ messages.
The second function of the fabric link is to pass traffic that needs to cross both nodes. This can only occur in A/A scenarios where traffic might enter an interface on one cluster node and needs to exit out of an interface on the other cluster node. Such traffic is also called Z-mode traffic.


The issue we experimented was very simple: we configure our to SRX 1400 for HA, and we do this into the LAB, connecting the two firewall directly throught two cables, one for the control link and one for the fabric link. In this configuration all was ok. When we migrate to the field, installing one firewall into one techincal room and the other one into another, connecting the controll link and fabric link to the Cisco switch 3850, there was no way to bring up the HA.

MTU Considerations from Juniper Documentation
Inter-cluster messages cannot be fragmented, requiring the transport network to have the ability accommodate them. The minimum MTU required for all platforms is 9014, with the exception of the SRX100s that require an MTU of 1632.
Due to the extra fabric headers added to the packets before they are sent through the fabric link, the MTU of the interfaces used in Z-mode deployments should not exceed1500 bytes on SRX100 platforms and 8900 bytes on any other platform.
Note: If you are connecting each of the fabric links through a switch, you must enable the jumbo frame feature on the corresponding switch ports. If both of the fabric links are connected through the same switch, the RTO-and-probes pair must be in one virtual LAN (VLAN) and the data pair must be in another VLAN. Here too, the jumbo frame feature must be enabled on the corresponding switch ports.

And also from a technical forum somewhere in the great sea of the internet:
FYI, it is supported on the High-end SRX. Look for an application note named "SRX series services gateways cluster deployment across layer 2 networks" (google will find it - its somewhere on the juniper website).

We did such a setup with 3400s a while back and it takes quite a bit of work to get this up and running:
  • if your switches perform IGMP snooping, try disabling it
  • if the switches are cisco, you need to disable the ip-header verification. They will verify the IP header even for switched traffic, and the packets sent by the SRXs aren't valid IP so they will get dropped without any logging
The solution we found to bring up the HA links was to enable the MTU Jumbo Fraime on the Cisco switches. We found also that on Cisco 3850 to enable the MTU Jumbo Fraime you need to enable it on all the switch and you have to reboot the firewall. On the contrary, on Cisco 6500 you can enable the MTU Jumbo Frame by single port. So we migrate the HA Links on Cisco 6500 and everything wa ok. Below you can find the configuration of the single port:


Configuration of the two ports on the first Cisco 6500

interface GigabitEthernet1/5/2
description Fw Juniper Prim Srx1400 Datalink Ge0/0/0 Fab0
switchport
switchport access vlan X
switchport mode access
mtu 9216
no logging event link-status
no snmp trap link-status
storm-control broadcast level 10.00
no cdp enable
spanning-tree portfast edge
spanning-tree bpduguard enable
end

interface GigabitEthernet1/5/3
description Fw Juniper Prim Srx1400 Control_link Ge0/0/10 Link0
switchport
switchport access vlan Y
switchport mode access
mtu 9216
no logging event link-status
no snmp trap link-status
storm-control broadcast level 10.00
no cdp enable
spanning-tree portfast edge
spanning-tree bpduguard enable
end


Configuration of the two ports on the second Cisco 6500

interface GigabitEthernet2/5/2
description Fw Juniper Sec Srx1400 Datalink Ge4/0/0 Fab1
switchport
switchport access vlan X
switchport mode access
mtu 9216
no logging event link-status
no snmp trap link-status
storm-control broadcast level 10.00
no cdp enable
spanning-tree portfast edge
spanning-tree bpduguard enable
end

interface GigabitEthernet2/5/3
description Fw Juniper Sec Srx1400 Control_link Ge4/0/10 Link1
switchport
switchport access vlan Y
switchport mode access
mtu 9216
no logging event link-status
no snmp trap link-status
storm-control broadcast level 10.00
no cdp enable
spanning-tree portfast edge
spanning-tree bpduguard enable
end


On the Juniper SRX 1400 firewall no change into the configuration file is required.

 I hope this post can help you and your troubleshooting!

Have a nice day!
DiGiTsHaMaN

lunedì 28 aprile 2014

JUNIPER SRX1400 CLUSTER DHCP RELAY CONFIGURATION MORE INTERFACES

Buon salve all,
how are you? How does proceed your digital life?
Some days ago I spoke you, in this post, about the solved issue I encounter to configure the dhcp relay into a Juniper SRX1400 cluster environment. Today I would like to update that issue describing you how you can configure a different DHCP-RELAY for a different reth you have configuerd on your firewall.

Technology involved: Juniper SRX 1400
Software release: JUNOS Software Release [12.1X46-D15.3]
Description: configuration, into a cluster environment, of the DHCP relay for reth X.Y. Configuration of a different DHCP relay for a different reth K.H. 


Into the image above you can see a simple network schema. This post will descrive the configuration you have to insert on the firewall Juniper SRX1400 to permit that some reth X.Y interface will forward the DHCP request to one DHCP server 01 and others (minimum one interface) will forward the DHCP request to a different DHCP server 02.

All the check you have to perform on the Juniper SRX 1400 are the same described into the previous post: firmware, jdhcpd, etc.

What does it have to change?
The following configuration:

forwarding-options {
    dhcp-relay {
        server-group {
            DHCP-SERVER-01 {
                XXX.YYY.ZZZ.KKK; (this is the ip address of the DHCP-SERVER-01)
            }
            DHCP-SERVER-02 {
                HHH.JJJ.WWW.QQQ; (this is the ip address of the DHCP-SERVER-02)
            }
        }
        group DHCP-SERVER-01-GROUP {
            active-server-group DHCP-SERVER-01;
            interface reth1.41;
            interface reth2.42;
            interface reth1.307;
            interface reth1.305;
        }
        group DHCP-SERVER-02-GROUP {
            active-server-group DHCP-SERVER-02;
            interface reth2.306;
            interface reth2.304
        }
    }
}

I hope this post can help you and your troubleshooting!

Have a nice day!
DiGiTsHaMaN

giovedì 17 aprile 2014

JUNIPER SRX1400 CLUSTER DHCP RELAY CONFIGURATION

Buon salve all,
how are you? How does proceed your digital life?
Today I speak you about a case I encountered some weeks ago. After an internet search, trying to solve the issue (you find it into the title) by myself, I don't find enough technical documentation; so I hope this post will help anyone of you will encounter the same problem.
So let's start. 

Technology involved: Juniper SRX 1400
Software release: JUNOS Software Release [12.1X46-D15.3]
Description: configuration, into a cluster environment, of the DHCP relay for reth X.Y. The examples and configurations, will follow, will be shown for reth 2.42 (my real and persona case).


First point - it's fundamental to have installed onboard at least the software release described above: the DHCP relay into a cluster environment is supported starting from this release and not before.

Second point - on your cluster juniper, from console type the following comand:
root# run show system processes extensive | grep dhcp

Check that the output of the command typed is:

1281 root        1  96    0 50280K 12060K select  19:38  0.00% jdhcpd

The important think is that you find jdhcpd and not dhcpd.
The dhcpd is the normal dhcp unders system services, and it's the usual way you can configure dhcp into a single environment. Obviously the jdhcpd is the only manner to configure dhcp and dhcp relay into a cluster environment. To enable the jdhcpd you can type the following command:

[edit]
set forwarding-options dhcp-relay server-group <sever-group-name> <ip-address>
set forwarding-options dhcp-relay active-server-group <server-group-name>
set forwarding-optoins dhcp-relay relay-option-60 vendor-option ……
set forwarding-options dhcp-relay group <group-name> interface <interface-name>
That, translated into my real case will produce the following configuration:

forwarding-options {
    dhcp-relay {
        server-group {
            DHCP-SERVER-XYZ {
                XXX.YYY.KKK.HHH;
            }
        }
        active-server-group DHCP-SERVER-XYZ;
        group DHCP-RELAY {
            interface reth2.42;
        }
    }
}

After done this, check again the output of the command:

root# run show system processes extensive | grep dhcp


Another command that can help you to understand if DHCP packets are exanched you cna type:
root# run show dhcp relay statistics

I hope this post can help you and you troubleshooting.


Have a nice day!
DiGiTsHaMaN


mercoledì 16 aprile 2014

ABOUT THIS NEW PROJECT


Buon salve all,

How are you? This is the first post of this new blog, this new project, and first of all I think it's better if I introdoce myself. You will know me as the DigitShaman, obviously a nickname, but a nickname that say something about me. 
I am an engineer, I work in Turin (but I don't live here, I traverl by train all the days), Italy. I am work as a consultant, and the job title my bosses decide to write on my businness card is Network System Engineer. All of this few words I hope explain the "Digit" part of the nickname. What about the second part, the "Shaman" part? This part say to you that I am also not so Digital as expected by an engineer. I am atypical for some aspects and absolutly typical for others. All of this words are just to say that you have to excuse me if sometimes I will not use rights and puctual technical words.
I will also ask you to excuse me if sometimes I will use a bad english; I hope to emprove it, using it.

Have a nice day!
DigitShaman